Washington state is known for its delicious apples. In fact, Washington produces 6 out of every 10 apples consumed in the United States! To highlight this local ingredient, applesauce from BelleWood Acres was added to this cold process recipe. BelleWood Acres is one of Northwest Washington’s largest apple orchards. It’s located just about 15 minutes away from the Bramble Berry offices and is a great addition to the community. Using a local ingredient in your soap is a fantastic way to highlight where it comes from and support other makers in your area.
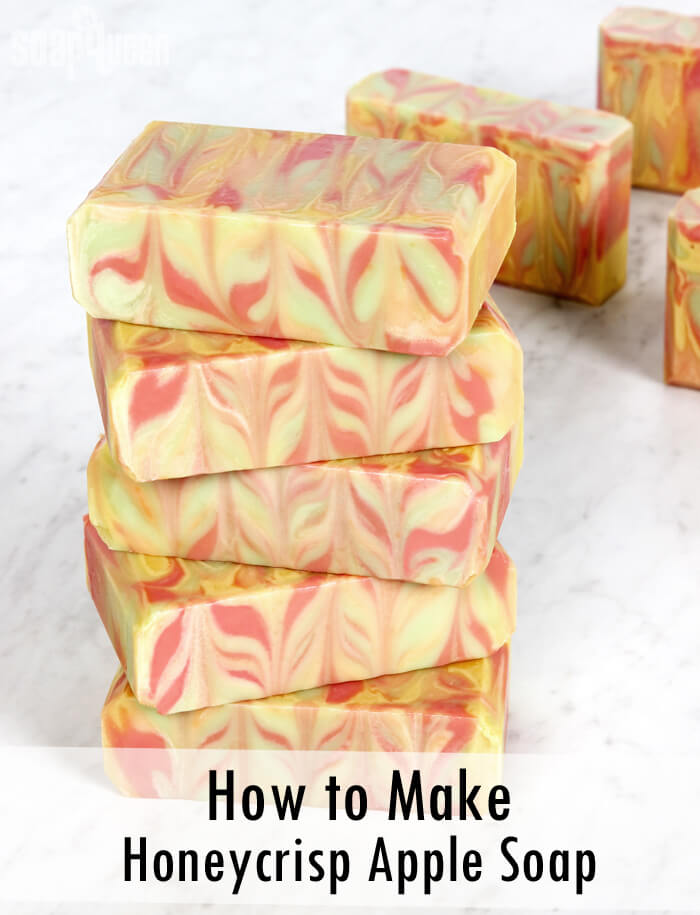
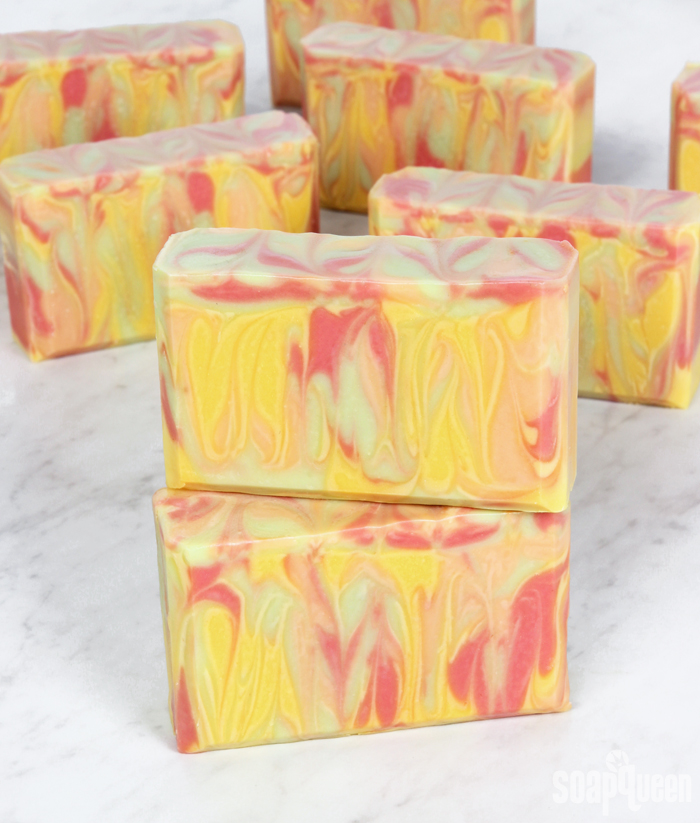
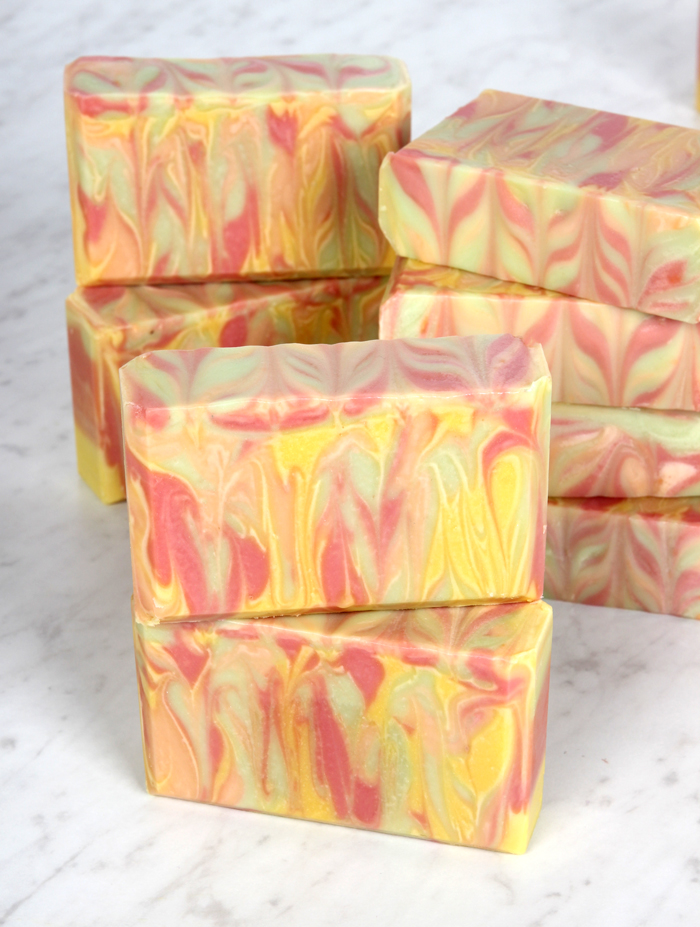
Normally when one thinks apples, a deep color palette of red and green come to mind. But because this soap contains applesauce made with Honeycrisp apples, we used colors inspired by them. That means shades of bright red/pink, green and a touch of yellow. Then, a Hanger Swirl is used to pull the colors up and down to mimic the stripes on the apples. Apple Macintosh Candle & Soap Fragrance Oil gives the bars a slightly tart and fruity scent.
If you’ve never added a puree to your soap before, read this article to learn how. Don’t worry about the applesauce going bad in the soap. It goes through the saponification process along with the oils and lye. The high pH of the soap batter contributes to this process (which is why adding purees to melt and pour is not recommended). To account for the extra water in the applesauce, this recipe contains a 10% water discount. I also recommend soaping at slightly cooler temperatures to compensate for the sugar in the applesauce. If you live in a hot climate, you may want to place the soap in the fridge after pouring into the mold to keep temperatures cool. The extra natural sugar will contribute to a fluffy lather in the final bars of soap. When selecting the applesauce, make sure it does not have any extra ingredients like preservatives. These could cause unpredictable results in your soap.

What You’ll Need:
10″ Silicone Loaf Mold
Hanger Swirl Tool
9.5 oz. Olive Oil (27%)
10.5 oz. Coconut Oil (30%)
8.8 oz. Palm Oil (25%)
1.8 oz. Shea Butter (5%)
3.5 oz. Avocado Oil (10%)
1 oz. Castor Oil (3%)
5 oz. Sodium Hydroxide Lye
10.4 oz. Distilled Water (10% water discount)
2 oz. Applesauce
1.7 oz. Apple Macintosh Candle & Soap Fragrance Oil
Buttercup Mica
Kermit Green Mica
Sunset Orange Mica
Raspberry Mica

Click here to add everything you need for this project to your Bramble Berry shopping cart!
If you've never made Cold Process soap before, stop here! I highly recommend checking out our FREE four part SoapQueen.tv series on Cold Process Soapmaking, especially the episode on lye safety. And if you'd rather do some reading, Bramble Berry carries a wide range of books on the topic, including my newest book, Pure Soapmaking. You can also checkout the digital downloads for that instant gratification factor.
SAFETY FIRST: Suit up for safe handling practices! That means goggles, gloves and long sleeves. Make sure kids, pets, and other distractions and tripping hazards are out of the house or don't have access to your soaping space. Always soap in a well-ventilated area.
COLOR PREP: In separate containers, disperse 1 tsp. Buttercup Mica and 1 tsp. Sunset Orange Mica into 1 tablespoon lightweight liquid oil. Then in separate containers, disperse 1/2 tsp. Kermit Green Mica and 1/2 tsp. Raspberry Mica into 1/2 tablespoon lightweight liquid oil (like sweet almond or sunflower oil). Use a mini mixer to help get rid of any clumps.
FRAGRANCE PREP: Measure 1.7 ounces of Apple Macintosh Fragrance Oil into a glass, fragrance oil safe container. Set aside.
APPLE PREP: Measure out 2 ounces of applesauce. Set aside.
ONE: Slowly and carefully add the lye to the water and gently stir until the lye has fully dissolved and the liquid is clear. Set aside to cool. If you'd like a harder bar of soap that releases faster from the mold, you can add sodium lactate to the cooled lye water. Use 1 teaspoon of sodium lactate per pound of oils in the recipe. For this recipe, you'd add 2 teaspoons sodium lactate.
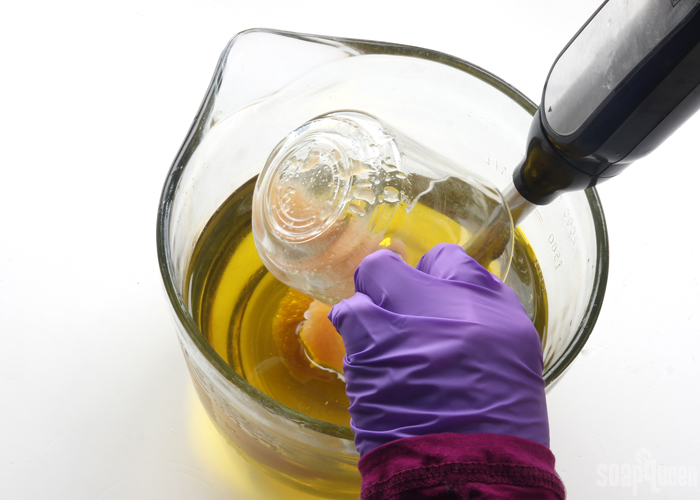
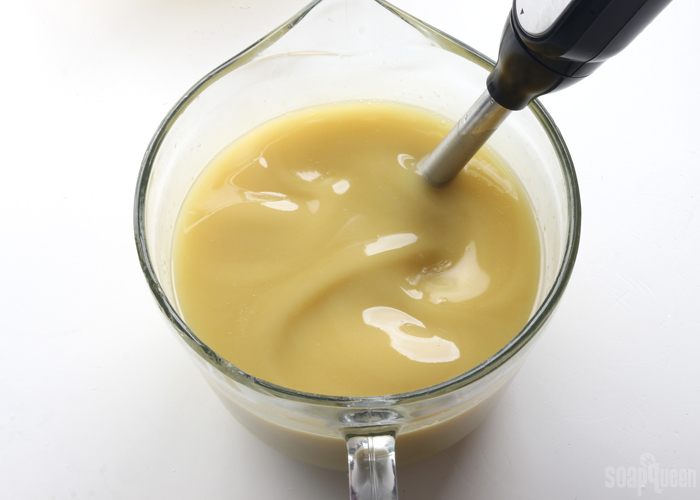
TWO: Fully melt and combine the coconut oil, palm oil, olive oil, castor oil, shea butter and avocado oil (remember to fully melt then mix your entire container of palm oil before portioning). Add the applesauce to the melted oils and stick blend for about a minute. Stick blending the applesauce before adding lye helps blend the applesauce into a smoother consistency without accelerating trace.
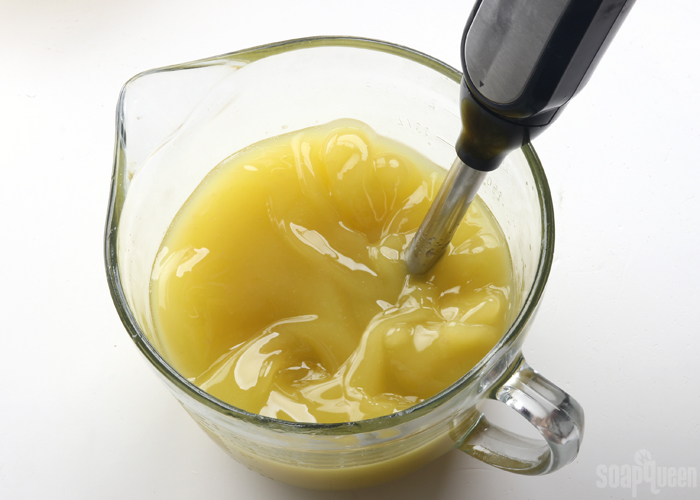 THREE: Add the lye water to the oils and stick blend until thin trace. After about 10-20 seconds of blending, you’ll notice the batter start to darken into a honey color. This is due to the sugar content in the applesauce.
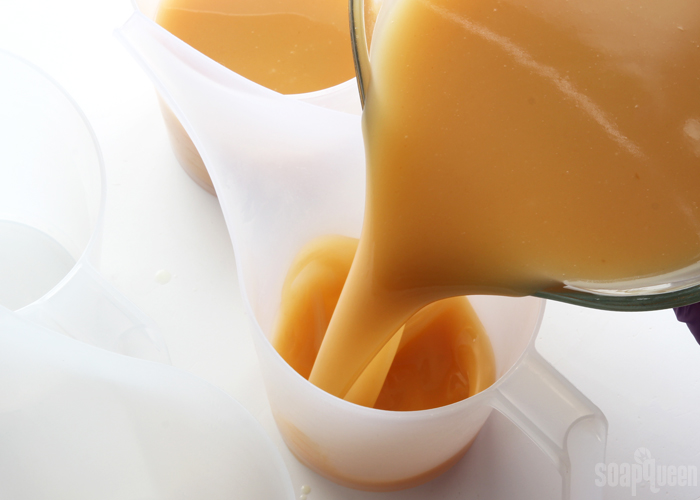
FOUR: Once you’ve reached a thin trace, split the soap into four equal containers. Each container will have about 400 mL. Check out that color change!
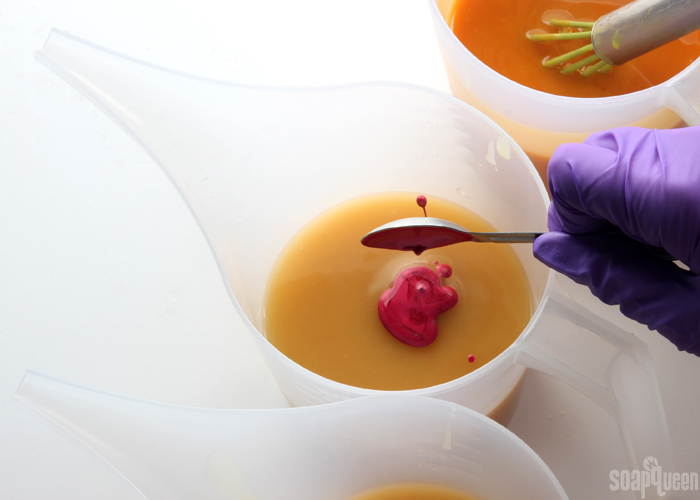
 FIVE: Add the following amounts of dispersed mica into each container. Use a whisk to fully mix in the color.
- Container A (pink): 1 tsp. dispersed Raspberry Mica + 1 tsp. Sunset Orange Mica
- Container B (green): 1 tsp. dispersed Kermit Green Mica
- Container C (orange): 1 tsp. dispersed Sunset Orange Mica
- Container D (yellow): All dispersed Buttercup Mica
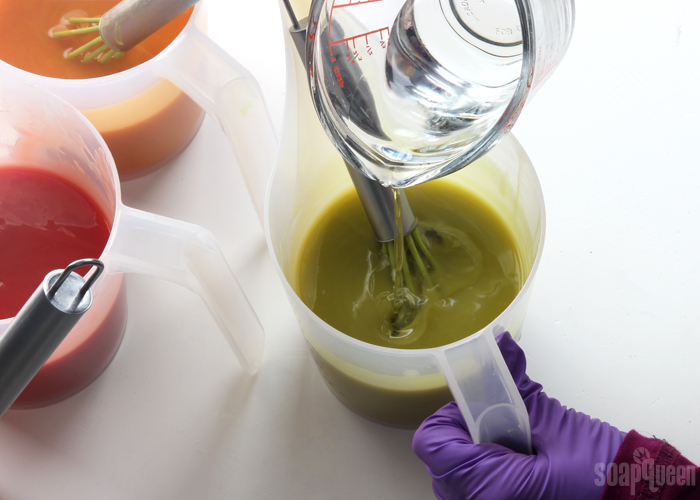
 SIX: Add the Apple Macintosh Candle & Soap Fragrance Oil evenly into each container (it’s okay to eyeball it). Use a whisk to fully mix in the fragrance oil into each container.
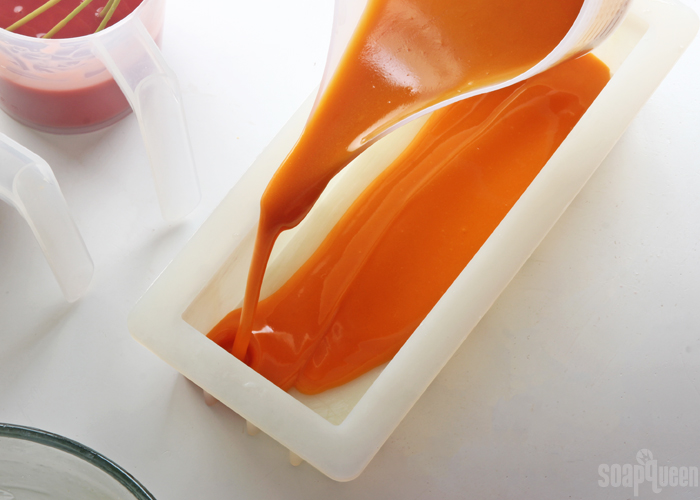
 SEVEN: Begin pouring stripes of each color down the length of the mold. It doesn’t really matter what color you start with, or in what order you pour the colors. I started with orange, then poured in the pink, green and yellow. Pour the colors from various heights so they break through to the layer below. Don’t worry about being too precise with each pour.
 EIGHT: Continue pouring the colors into the mold. Expect to have enough soap for about four pours of each color. Continue pouring until you have a small amount of each color for the top.
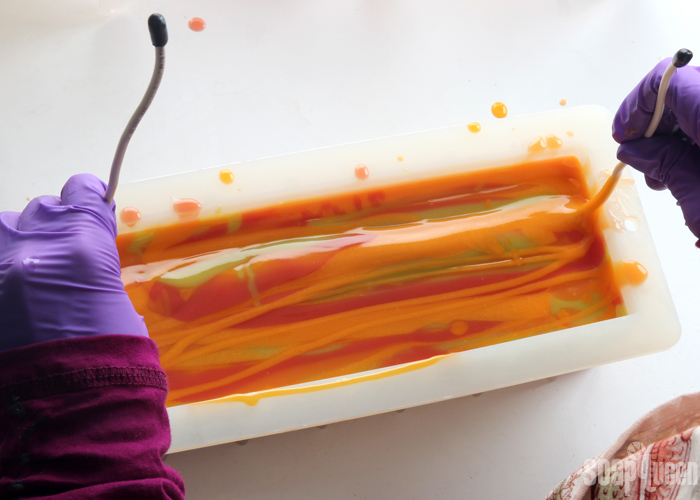
 NINE: Insert the Hanger Swirl Tool into one side of the mold, all the way to the bottom. Drag the hanger against the bottom of the mold toward you. Once you drag the hanger about 1/8th of the way, pull the hanger up until it almost breaks through the top of the soap, but not quite. Move the hanger toward you about 1/8th of the way. Push the hanger back down into the soap, and drag the hanger against the bottom of the mold and move it toward you again, moving about 1/8th of the way. Bring the hanger up until it almost breaks the top, then move it over and push it back down. Repeat this process again, moving in the opposite direction. Only move the Hanger Swirl Tool vertically in the mold. This wasn't my most precise hanger swirl, so don't worry about making it perfect!
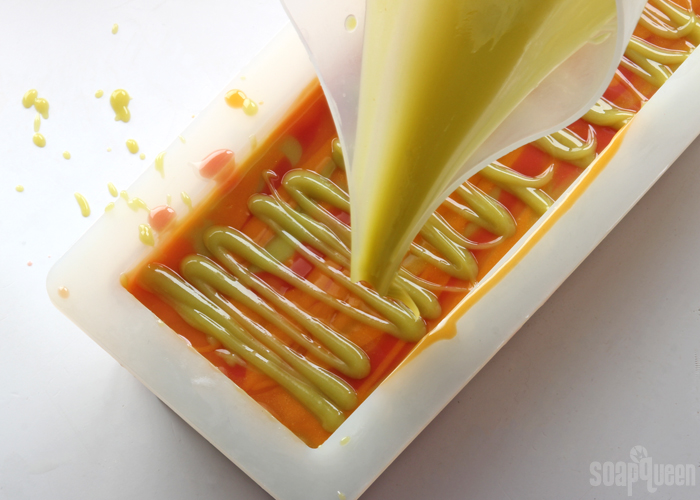
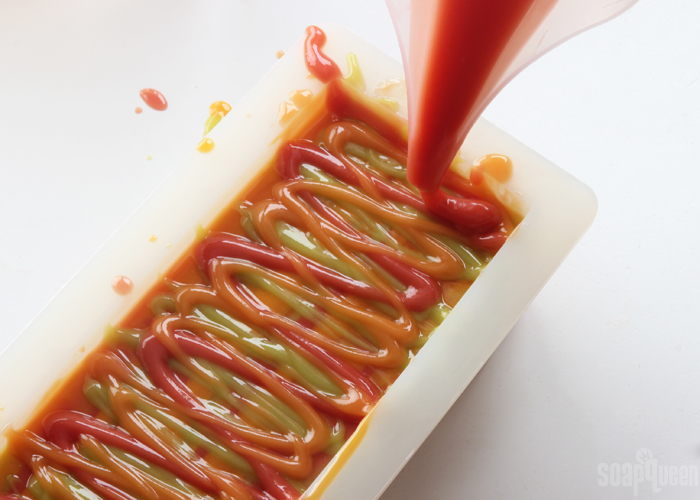
 TEN: Tap the mold on the counter to help get rid of any bubbles. Drizzle each color on top down the length of the mold.
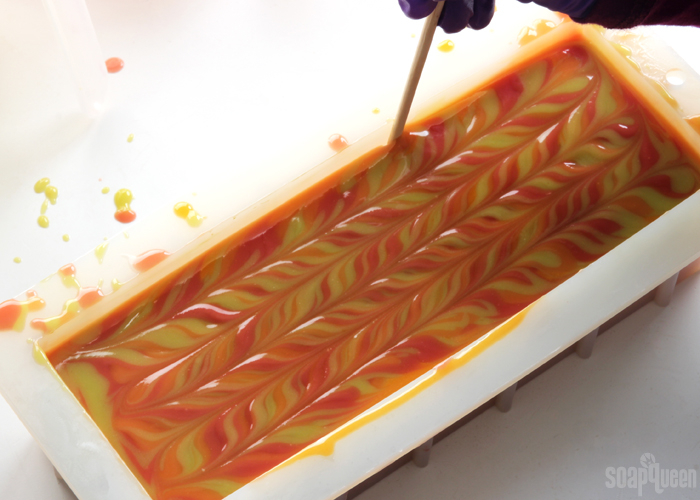
 ELEVEN: Insert a chopstick or dowel into the very top of the soap (you only want to swirl the very top). Drag the tool down the length of the mold opposite of the direction you poured the soap on top to create the most interesting swirl. Don’t over swirl or the colors will muddle. Once you’re happy with the look, spritz the soap with 99% isopropyl alcohol to avoid soda ash.
Due to the extra sugar in the applesauce, this soap may have a tendency to get hot. If your room temperature is on the cooler side, you can leave it out on the counter without insulation for the first 24 hours. If you live in a hot climate, you may want to place the soap into the fridge for at least 2 hours up to overnight. Allow the soap to stay in the mold for about 3 days. Remove from the mold and cut into bars. Allow the bars to cure for 4-6 weeks and enjoy!
Honeycrisp Apple Cold Process Soap Tutorial
Author: Cold Process Soap
- 10″ Silicone Loaf Mold
- Hanger Swirl Tool
- 9.5 oz. Olive Oil (27%)
- 10.5 oz. Coconut Oil (30%)
- 8.8 oz. Palm Oil (25%)
- 1.8 oz. Shea Butter (5%)
- 3.5 oz. Avocado Oil (10%)
- 1 oz. Castor Oil (3%)
- 5 oz. Sodium Hydroxide Lye
- 10.4 oz. Distilled Water (10% water discount)
- 2 oz. Applesauce
- 1.7 oz. Apple Macintosh Candle & Soap Fragrance Oil
- Buttercup Mica
- Kermit Green Mica
- Sunset Orange Mica
- Raspberry Mica
- Slowly and carefully add the lye to the water and gently stir until the lye has fully dissolved and the liquid is clear. Set aside to cool. If you'd like a harder bar of soap that releases faster from the mold, you can add sodium lactate to the cooled lye water. Use 1 teaspoon of sodium lactate per pound of oils in the recipe. For this recipe, you'd add 2 teaspoons sodium lactate.
- Fully melt and combine the coconut oil, palm oil, olive oil, castor oil, shea butter and avocado oil (remember to fully melt then mix your entire container of palm oil before portioning). Add the applesauce to the melted oils and stick blend for about a minute. Stick blending the applesauce before adding lye helps blend the applesauce into a smoother consistency without accelerating trace.
- Add the lye water to the oils and stick blend until thin trace. After about 10-20 seconds of blending, you'll notice the batter start to darken into a honey color. This is due to the sugar content in the applesauce.
- Once you've reached a thin trace, split the soap into four equal containers. Each container will have about 400 mL. Check out that color change!
- Add the following amounts of dispersed mica into each container. Use a whisk to fully mix in the color.
Container A (pink): 1 tsp. dispersed Raspberry Mica + 1 tsp. Sunset Orange Mica
Container B (green): 1 tsp. dispersed Kermit Green Mica
Container C (orange): 1 tsp. dispersed Sunset Orange Mica
Container D (yellow): All dispersed Buttercup Mica - Add the Apple Macintosh Candle & Soap Fragrance Oil evenly into each container (it's okay to eyeball it). Use a whisk to fully mix in the fragrance oil into each container.
- Begin pouring stripes of each color down the length of the mold. It doesn't really matter what color you start with, or in what order you pour the colors. I started with orange, then poured in the pink, green and yellow. Pour the colors from various heights so they break through to the layer below. Don't worry about being too precise with each pour.
- Continue pouring the colors into the mold. Expect to have enough soap for about four pours of each color. Continue pouring until you have a small amount of each color for the top.
- Insert the Hanger Swirl Tool into one side of the mold, all the way to the bottom. Drag the hanger against the bottom of the mold toward you. Once you drag the hanger about ⅛th of the way, pull the hanger up until it almost breaks through the top of the soap, but not quite. Move the hanger toward you about ⅛th of the way. Push the hanger back down into the soap, and drag the hanger against the bottom of the mold and move it toward you again, moving about ⅛th of the way. Bring the hanger up until it almost breaks the top, then move it over and push it back down. Repeat this process again, moving in the opposite direction. Only move the Hanger Swirl Tool vertically in the mold. This wasn't my most precise hanger swirl, so don't worry about making it perfect!
- Tap the mold on the counter to help get rid of any bubbles. Drizzle each color on top, down the length of the mold.
- Insert a chopstick or dowel into the very top of the soap (you only want to swirl the very top). Drag the tool down the length of the mold, opposite of the direction you poured the soap on top to create the most interesting swirl. Don't over swirl or the colors will muddle. Once you're happy with the look, spritz the soap with 99% isopropyl alcohol to avoid soda ash.
- Due to the extra sugar in the applesauce, this soap may have a tendency to get hot. If your room temperature is on the cooler side, you can leave it out on the counter without insulation for the first 24 hours. If you live in a hot climate, you may want to place the soap into the fridge for at least 2 hours, up to overnight. Allow the soap to stay in the mold for about 3 days. Remove from the mold and cut into bars. Allow the bars to cure for 4-6 weeks and enjoy!
3.3.3077
The post Honeycrisp Apple Cold Process Soap Tutorial appeared first on Soap Queen.

Keine Kommentare:
Kommentar veröffentlichen