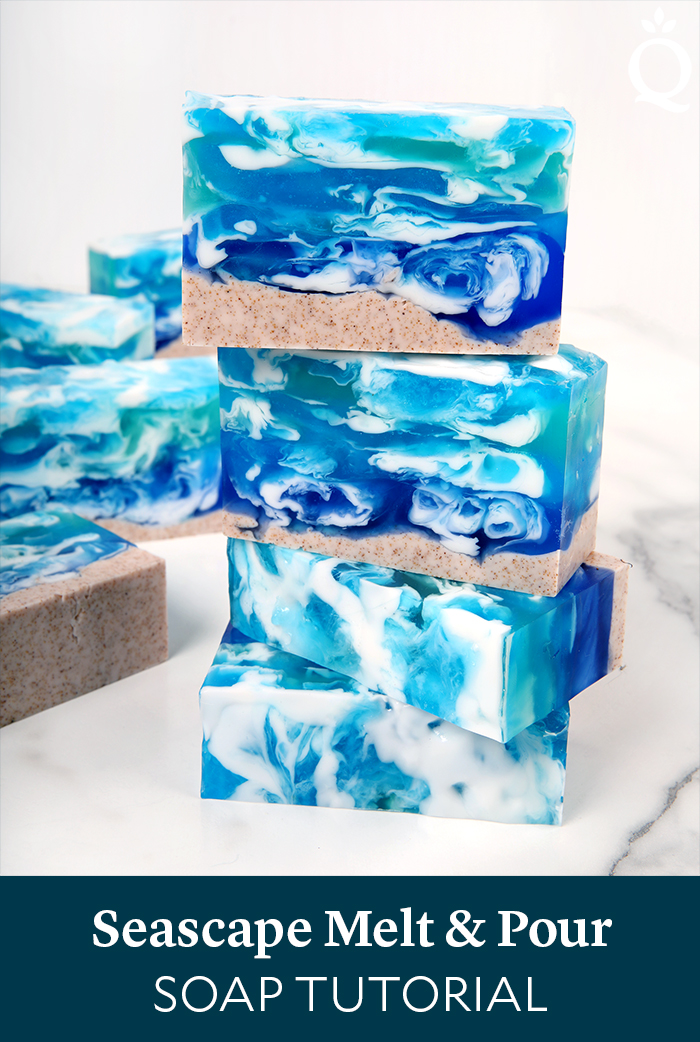
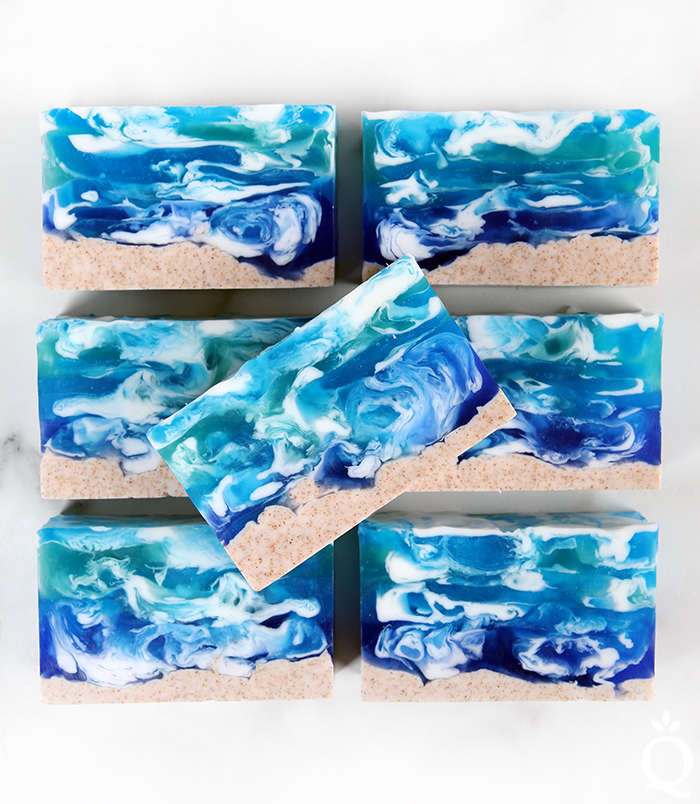
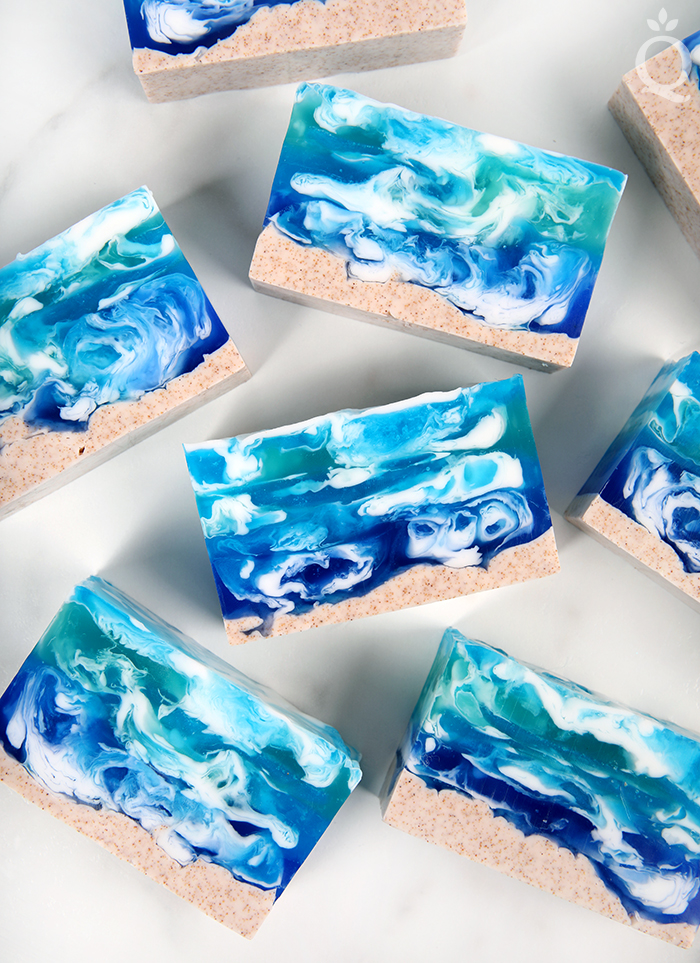
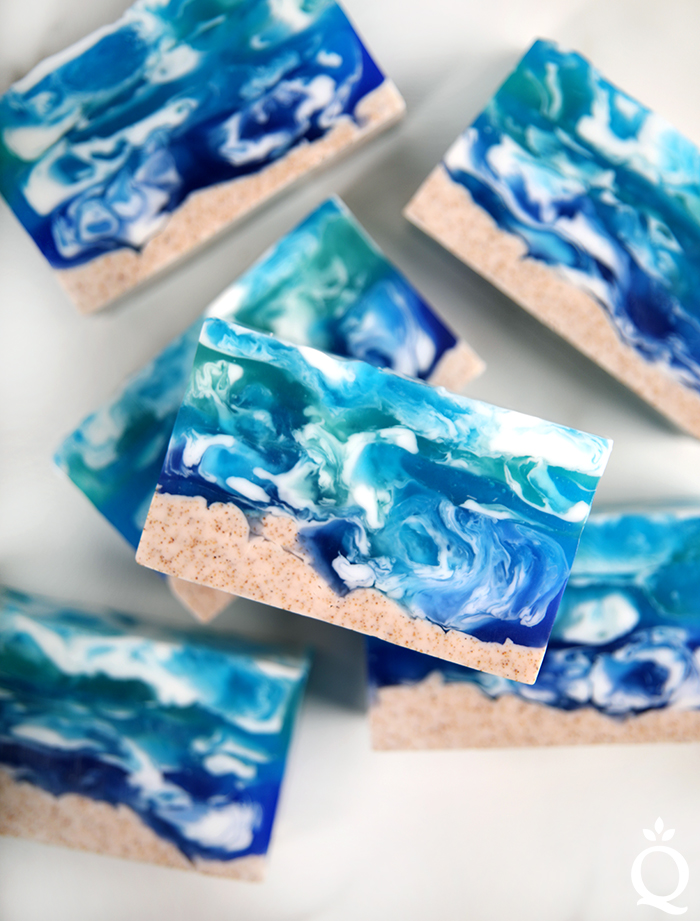
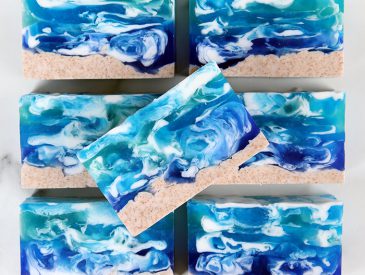
If you love crafting with melt and pour and you want a challenge, this Seascape Soap is for you. This project involves layering and swirling various shades of white, blue, and green soap to create a beautiful sea-inspired bar. It’s scented with Midnight Waters Fragrance Oil, which is a complex and sultry blend of bergamot, sea water, and patchouli.
The key to this project is a good understanding of how melt and pour soap behaves at different temperatures. The hotter it is, the thinner it is. As it cools, it becomes thicker and more viscous. When swirling soap around 135 degrees F, the colors are more likely to completely blend and the swirl becomes more muddled. If the soap is too cool, you end up with large clumps and layers of soap.
We found a good swirling temperature is between 120-130 degrees F. It’s also helpful to use both clear and white soap in your swirl – this keeps the various colors of clear soap distinct. Sometimes it also works well to pour a hotter batch of soap into a cooler one, and vice versa.
 This post has more tips for how to swirl melt and pour soap, but the key is truly practice and patience. Using fresh melt and pour also helps, as it’s less likely to scorch and stays fluid longer. Also, don’t forget to have a spray bottle of 99% isopropyl alcohol handy. Spray before every pour to help the layers adhere, and spray after each pour to get rid of bubbles.
ONE: Chop 20 ounces of White Melt and Pour Soap Base into small, uniform cubes. Place them into a heat-safe container and melt in the microwave using 20-30 second bursts. Stir between each burst.
TWO: Add 0.3 ounces of Midnight Fragrance Oil and 0.3 ounces of Vanilla Color Stabilizer. Stir to fully mix. Pour half of the soap into a separate container (it’s okay to eyeball it).
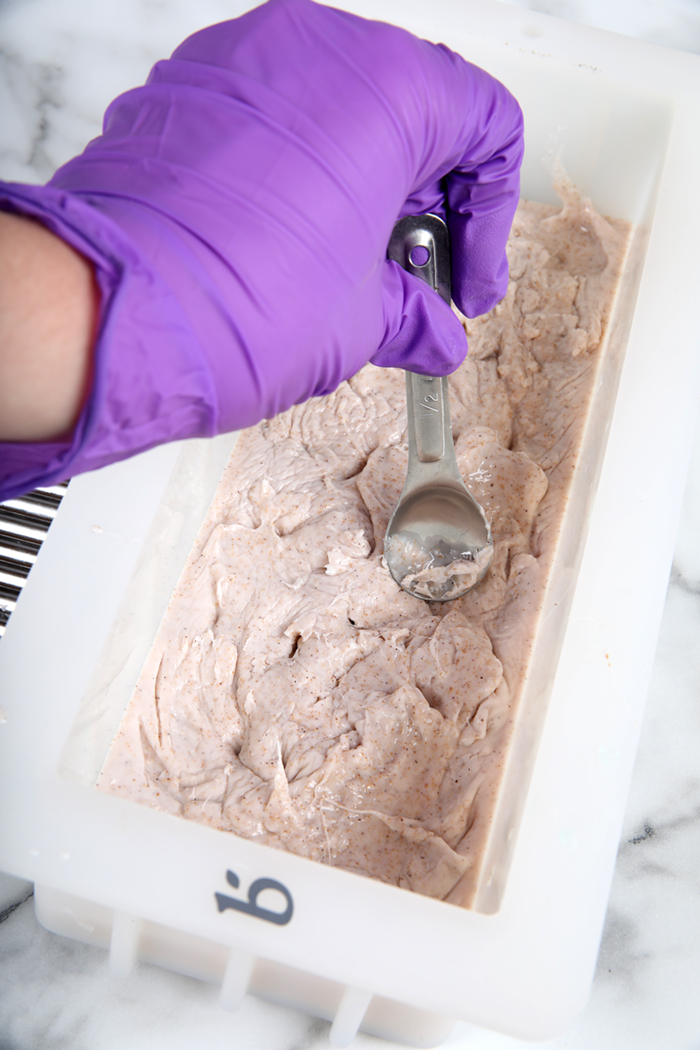
THREE: Set one container of white soap aside. To the other container of white soap, add 1 tablespoon of walnut shells and mix until there are no clumps. Add a small shaving of the Brown Oxide Color Block and stir. If the color block isn’t melting, place the soap in the microwave using 5 second bursts until it does.

FOUR: Wait for the brown soap to cool to about 120-125 degrees F. If the soap is too hot, the walnut shells may sink to the bottom. Pour the soap into the mold and spritz with alcohol to get rid of bubbles.
FIVE: Wait for the soap to cool and form a thick skin on top. Use a spoon to press the soap in random shapes. You want to make peaks and divots – like the bottom of the ocean floor. There is no right or wrong way to do it, so have fun with it. Once you’re happy with the bottom layer, set the mold aside.
SIX: Chop 32 ounces of Clear Melt and Pour Soap Base into small, uniform cubes. Place 16 ounces of the chopped soap base into one container with a small chunks of the Caribbean Blue Color Block. Place 8 ounces of soap base into another container with small chunks of the Hydrated Chrome Green Color Block. Place the remaining 8 ounces of soap base into another container with small chunks of the Ultramarine Blue Color Block.
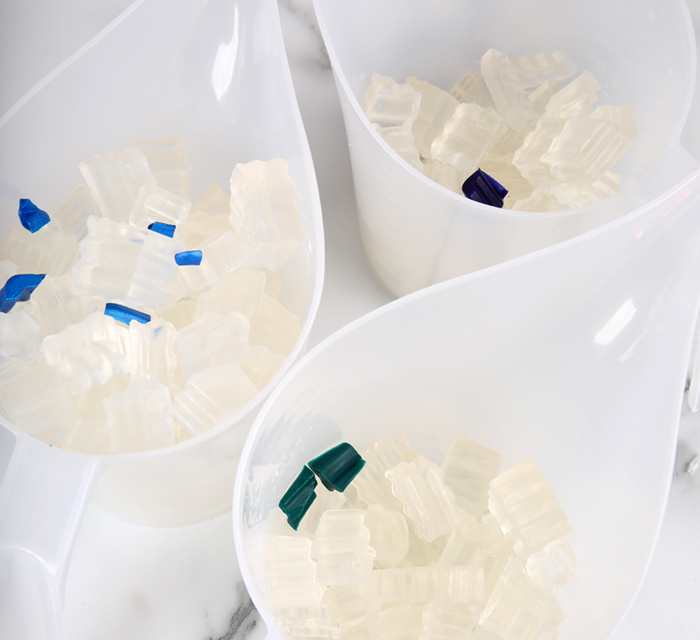
SEVEN: Melt all three containers of soap in the microwave using 20-30 second bursts, stirring between each one. You can melt all three containers at the same time if your microwave is large enough, just make sure to keep an eye on the smaller containers so they don’t get too hot and scorch.
EIGHT: Once all the soap is melted, add 0.3 ounces of Midnight Waters Fragrance Oil and 0.3 ounces of Vanilla Color Stabilizer to Caribbean Blue colored soap. Then add 0.1 ounces of Midnight Waters Fragrance Oil and 0.1 ounces of Vanilla Color Stabilizer to the other two containers of soap colored with Hydrated Chrome Green and Ultramarine Blue. Mix in the fragrance thoroughly into each container of soap.
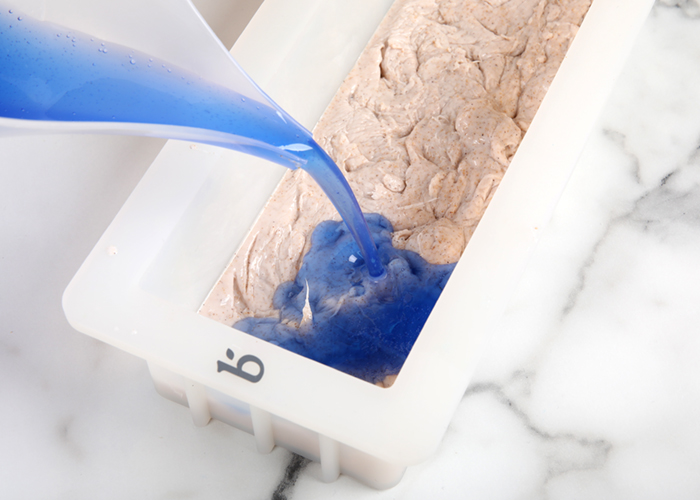
NINE: Remelt the container of white soap that was set aside using 10-15 second bursts. Now it’s time to swirl and layer. The three colors you’ll be working with first are the Ultramarine Blue soap, Caribbean Blue soap, and the white soap. All of those colors should be about 120-125 degrees F.
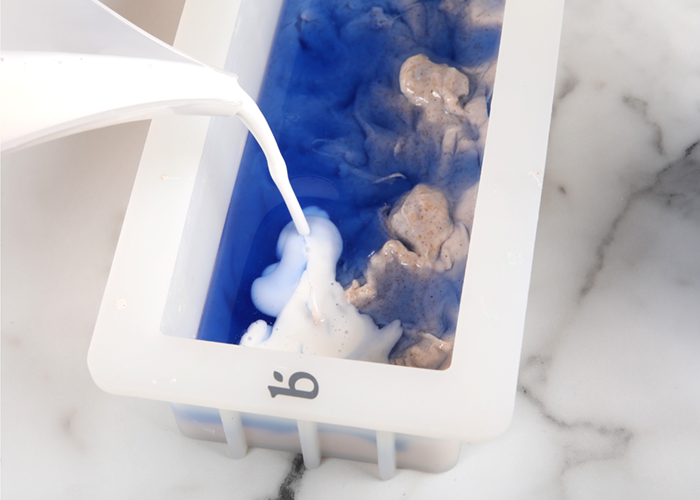
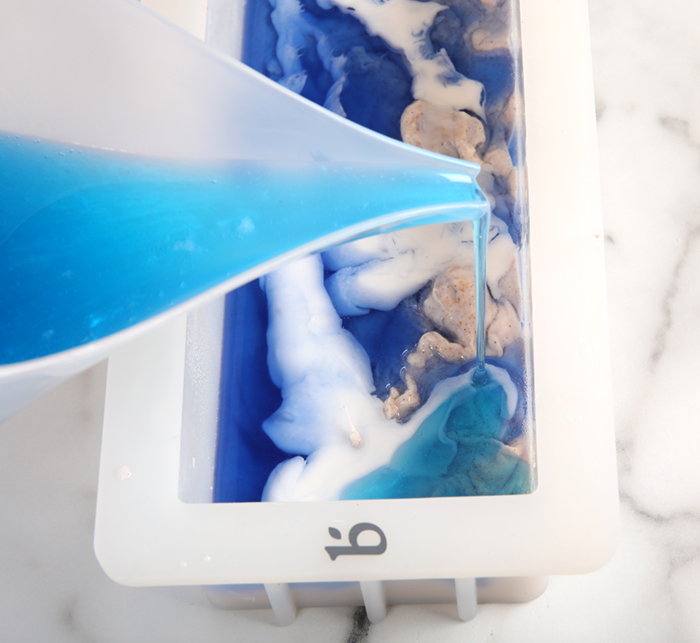
TEN: Spritz the bottom layer of soap with 99% isopropyl alcohol and pour a bit of the Ultramarine Blue Soap into the mold. Spritz with 99% isopropyl alcohol after every pour to get rid of bubbles as necessary. Then pour a little bit of white soap into the blue soap, all the way down the mold.
TIP: Notice how the white soap “spreads” into the blue. The hotter the soap, the more it will spread and combine. You want the colors to stay separate, but still flow when poured into each other. If the colors are totally combining, allow the soap to cool a little bit.
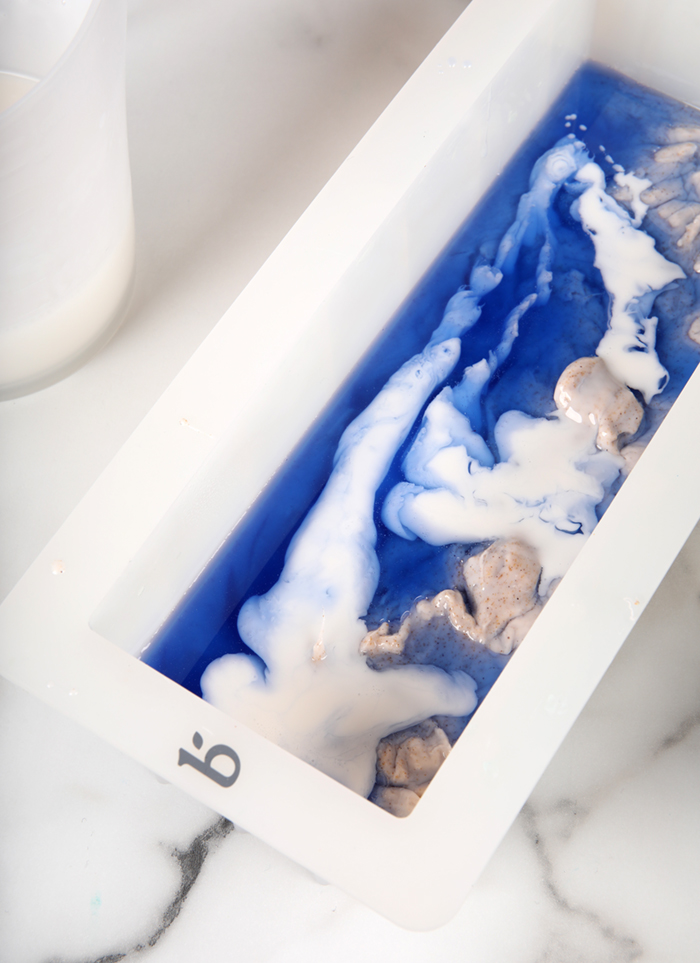
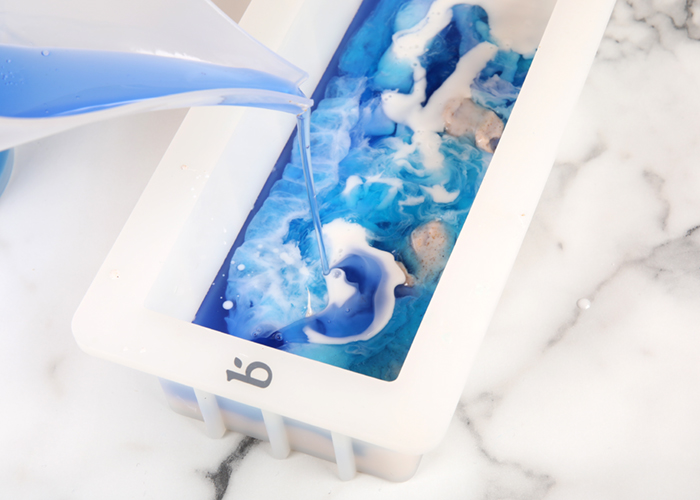
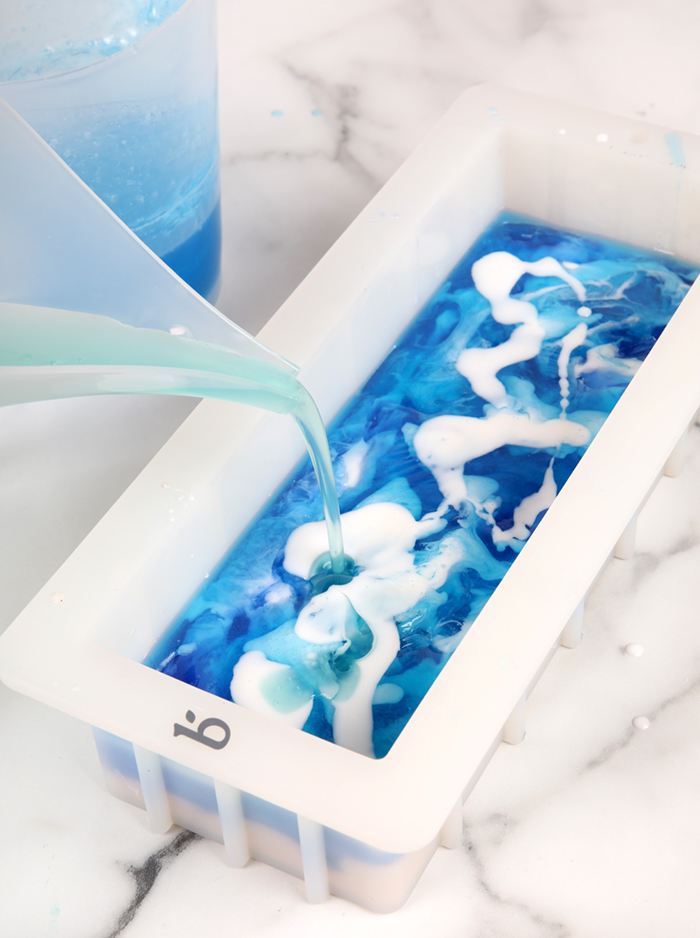
ELEVEN: Allow the soap to cool in the mold, but only slightly. For this project you don’t need to wait for each layer to cool completely. Because each pour is so small, it will cool rather quickly. Wait for the soap to form a light to medium skin, spritz with 99% isopropyl alcohol, and pour a small amount of the Caribbean Blue soap, followed by small pours of the white and Ultramarine Blue soap. Spritz with 99% isopropyl alcohol to get rid of bubbles as necessary.
TWELVE: Allow the soap to cool in the mold for about 1-2 minutes. The amount of time it needs to cool will vary depending on how hot the soap was when poured. It doesn’t need to be cooled completely or have a thick skin. Allowing the soap to cool slightly helps suspend the layers and keep colors from swirling together too much and becoming muddled. If necessary, place any of the soap into the microwave for 5-10 second bursts if they have become too thick to pour.
Spritz with 99% isopropyl alcohol, and continue to pour small amounts of the white soap, Caribbean Blue and the rest of the Ultramarine Blue soap. You should still have about 2/3 of the Caribbean Blue soap left.
TIP: Squeezing the soap mold helps you determine the temperature. Below, you can see it has a thin layer when squeezed, but it’s still strong enough to be squeezed without melted soap oozing out. This is a great time to pour more soap on top.
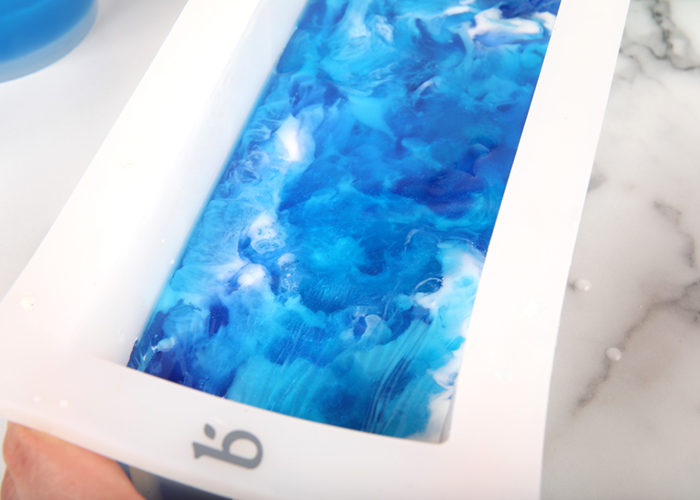
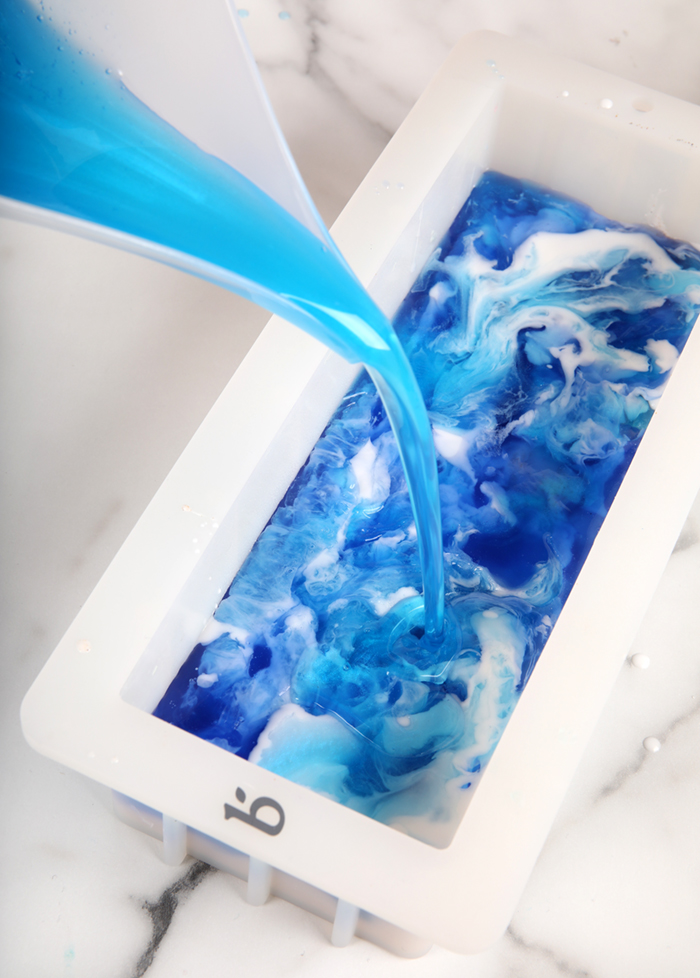
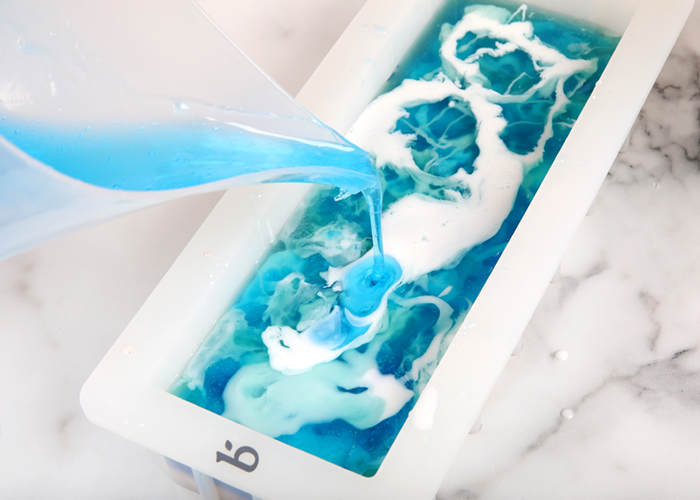
THIRTEEN: Allow these pours to cool slightly, spritz with 99% isopropyl alcohol, and begin pouring small amounts of the Hydrated Chrome Green soap, white soap, and Caribbean Blue soap into the mold. Spritz with 99% isopropyl alcohol to get rid of bubbles as necessary.
FOURTEEN: Continue pouring layers of the white, Hydrated Chrome Green, and Caribbean Blue soap until all of the Hydrated Chrome Green soap is in the mold. You should still have a little bit of Caribbean Blue soap and white soap left.
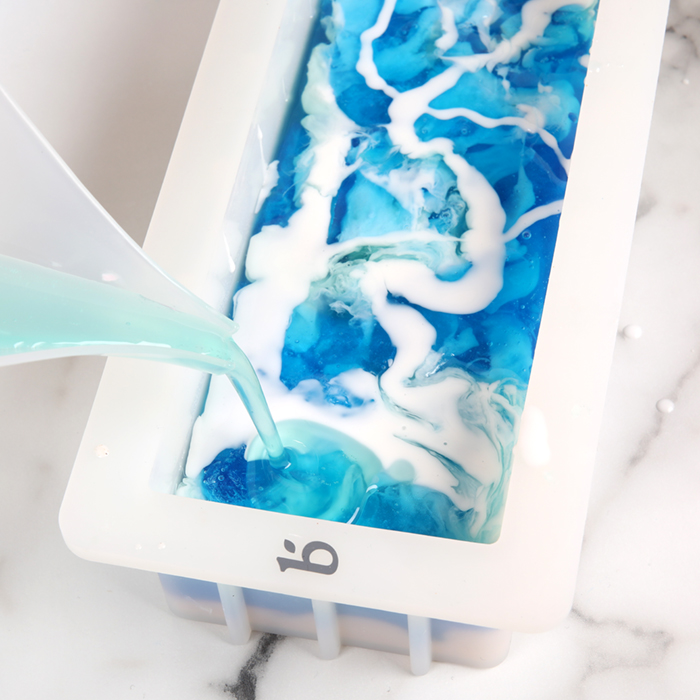
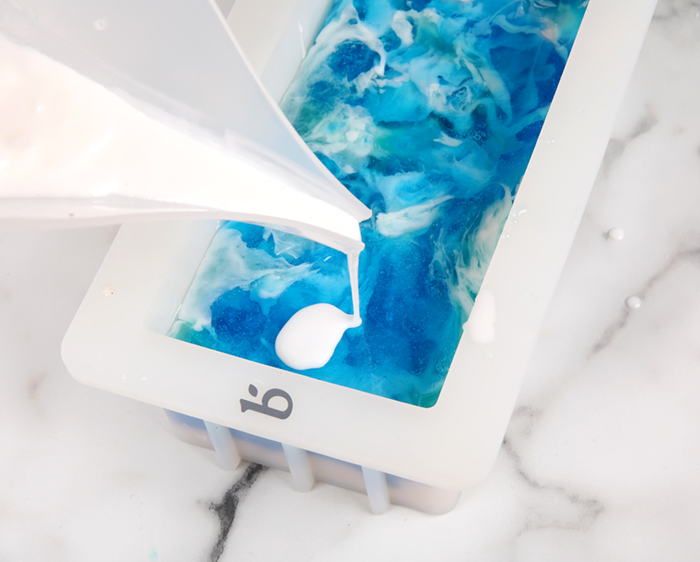
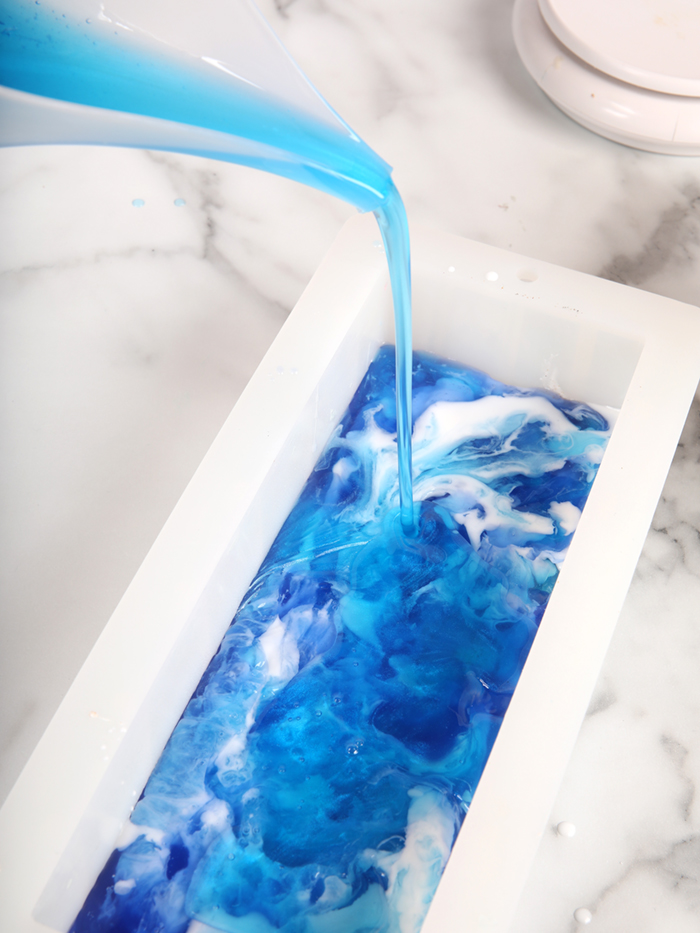
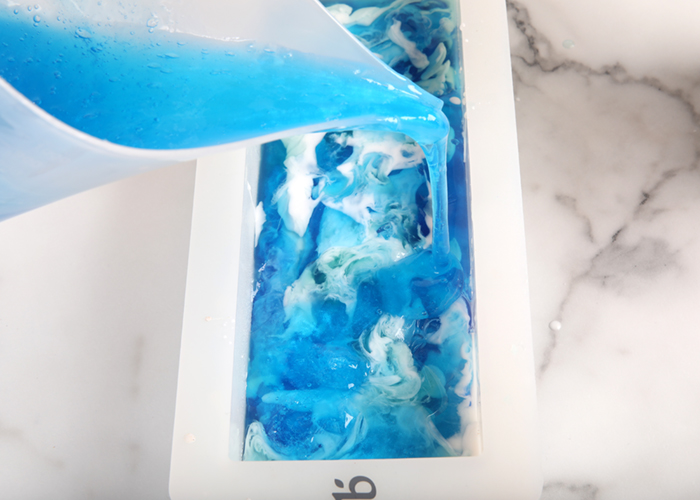
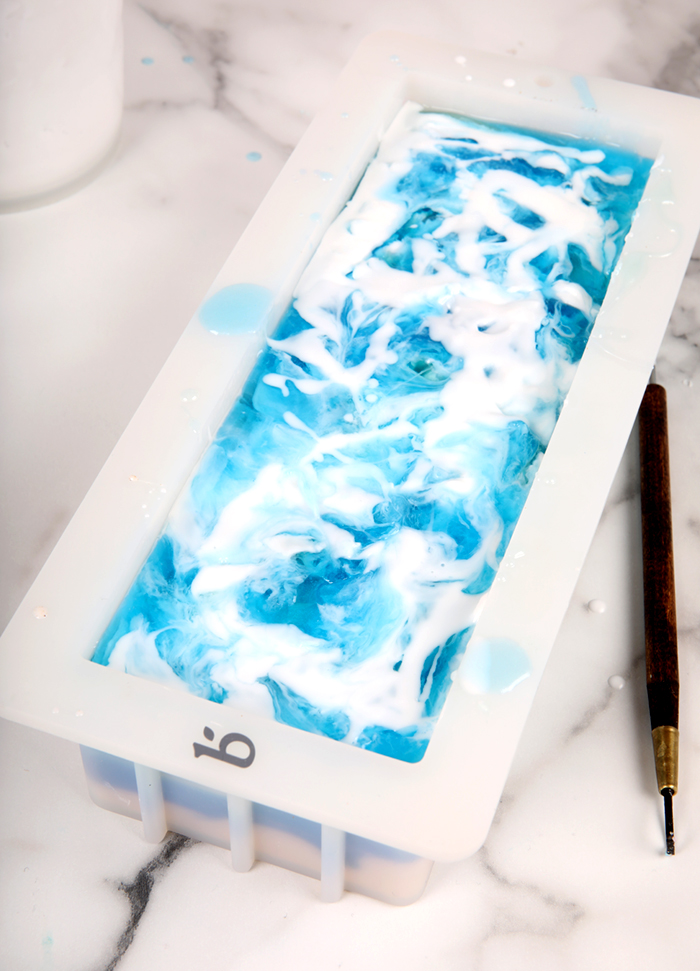
FIFTEEN: Allow these pours to cool slightly, spritz with 99% isopropyl alcohol, and begin pouring the last of the white and Caribbean Blue soap into the mold. Save any last bits of white for the very top.
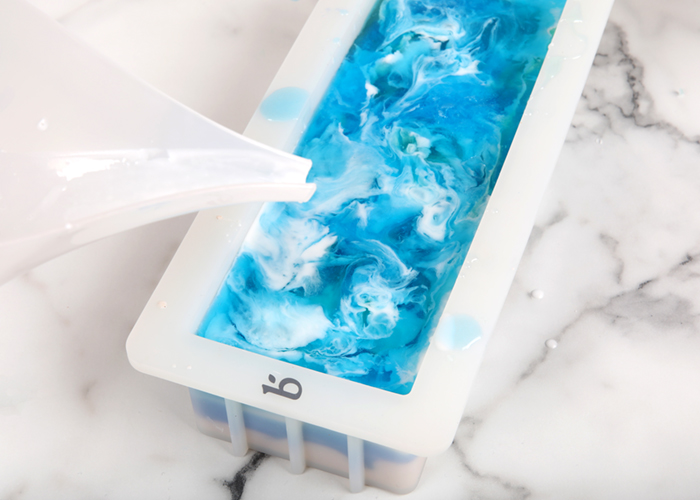
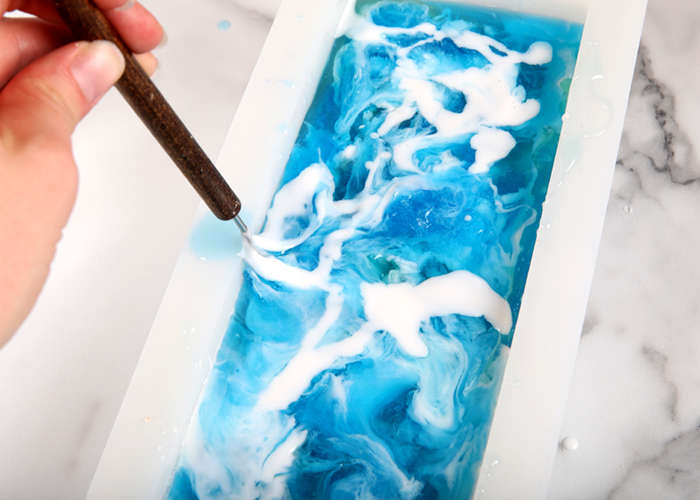
Our final white soap was a little bit on the thick side, and we ended up with some big glops of soap on top, but that’s okay. If it’s still somewhat fluid, you can use a Clean Up Tool (or knife, spoon, chopstick, etc.) and push and swirl the melt and pour to break up any big clumps.
SIXTEEN: Allow the soap to fully harden and cool in the mold for at least 4-5 hours, preferably overnight. We find when we try to cut into melt and pour soap that’s slightly warm, the layers are more likely to separate. Once it’s cool, remove from the mold and cut into bars. Wrap the bars in plastic wrap to prevent glycerin dew. Enjoy.
Seascape Melt & Pour Soap Tutorial
Author: Soap Queen
Recipe type: Melt and Pour Soap
- 10″ Silicone Loaf Mold
- 32 oz. Clear Melt & Pour Soap Base
- 20 oz. White Melt & Pour Soap Base
- 0.8 oz. Midnight Waters Fragrance Oil
- 0.8 oz. Vanilla Color Stabilizer
- 1 Tbsp. Walnut Shells
- Caribbean Blue Color Block
- Ultramarine Blue Color Block
- Hydrated Chrome Green Color Block
- Brown Oxide Color Block
- 99% Isopropyl Alcohol in a Spray Bottle
- Chop 20 ounces of White Melt and Pour Soap Base into small, uniform cubes. Place them into a heat-safe container and melt in the microwave using 20-30 second bursts. Stir between each burst.
- Add 0.3 ounces of Midnight Fragrance Oil and 0.3 ounces of Vanilla Color Stabilizer. Stir to fully mix. Pour half of the soap into a separate container (it's okay to eyeball it).
- Set one container of white soap aside. To the other container of white soap, add 1 tablespoon of walnut shells and mix until there are no clumps. Add a small shaving of the Brown Oxide Color Block and stir. If the color block isn't melting, place the soap in the microwave using 5 second bursts until it does.
- Wait for the brown soap to cool to about 120-125 degrees F. If the soap is too hot, the walnut shells may sink to the bottom. Pour the soap into the mold and spritz with alcohol to get rid of bubbles.
- Wait for the soap to cool and form a thick skin on top. Use a spoon to press the soap in random shapes. You want to make peaks and divots – like the bottom of the ocean floor. There is no right or wrong way to do it, so have fun with it. Once you're happy with the bottom layer, set the mold aside.
- Chop 32 ounces of Clear Melt and Pour Soap Base into small, uniform cubes. Place 16 ounces of the chopped soap base into one container with a small chunks of the Caribbean Blue Color Block. Place 8 ounces of soap base into another container with small chunks of the Hydrated Chrome Green Color Block. Place the remaining 8 ounces of soap base into another container with small chunks of the Ultramarine Blue Color Block.
- Melt all three containers of soap in the microwave using 20-30 second bursts, stirring between each one. You can melt all three containers at the same time if your microwave is large enough, just make sure to keep an eye on the smaller containers so they don't get too hot and scorch.
- Once all the soap is melted, add 0.3 ounces of Midnight Waters Fragrance Oil and 0.3 ounces of Vanilla Color Stabilizer to Caribbean Blue colored soap. Then add 0.1 ounces of Midnight Waters Fragrance Oil and 0.1 ounces of Vanilla Color Stabilizer to the other two containers of soap colored with Hydrated Chrome Green and Ultramarine Blue. Mix in the fragrance thoroughly into each container of soap.
- Remelt the container of white soap that was set aside using 10-15 second bursts. Now it's time to swirl and layer. The three colors you'll be working with first are the Ultramarine Blue soap, Caribbean Blue soap, and the white soap. All of those colors should be about 120-125 degrees F.
- Spritz the bottom layer of soap with 99% isopropyl alcohol and pour a bit of the Ultramarine Blue Soap into the mold. Spritz with 99% isopropyl alcohol after every pour to get rid of bubbles as necessary. Then pour a little bit of white soap into the blue soap, all the way down the mold. TIP: Notice how the white soap "spreads" into the blue. The hotter the soap, the more it will spread and combine. You want the colors to stay separate, but still flow when poured into each other. If the colors are totally combining, allow the soap to cool a little bit.
- Allow the soap to cool in the mold, but only slightly. For this project you don't need to wait for each layer to cool completely. Because each pour is so small, it will cool rather quickly. Wait for the soap to form a light to medium skin, spritz with 99% isopropyl alcohol, and pour a small amount of the Caribbean Blue soap, followed by small pours of the white and Ultramarine Blue soap. Spritz with 99% isopropyl alcohol to get rid of bubbles as necessary.
- Allow the soap to cool in the mold for about 1-2 minutes. The amount of time it needs to cool will vary depending on how hot the soap was when poured. It doesn't need to be cooled completely or have a thick skin. Allowing the soap to cool slightly helps suspend the layers and keep colors from swirling together too much and becoming muddled. If necessary, place any of the soap into the microwave for 5-10 second bursts if they have become too thick to pour. Spritz with 99% isopropyl alcohol, and continue to pour small amounts of the white soap, Caribbean Blue and the rest of the Ultramarine Blue soap. You should still have about ⅔ of the Caribbean Blue soap left. TIP: Squeezing the soap mold helps you determine the temperature. Below, you can see it has a thin layer when squeezed, but it's still strong enough to be squeezed without melted soap oozing out. This is a great time to pour more soap on top.
- Allow these pours to cool slightly, spritz with 99% isopropyl alcohol, and begin pouring small amounts of the Hydrated Chrome Green soap, white soap, and Caribbean Blue soap into the mold. Spritz with 99% isopropyl alcohol to get rid of bubbles as necessary.
- Continue pouring layers of the white, Hydrated Chrome Green, and Caribbean Blue soap until all of the Hydrated Chrome Green soap is in the mold. You should still have a little bit of Caribbean Blue soap and white soap left.
- Allow these pours to cool slightly, spritz with 99% isopropyl alcohol, and begin pouring the last of the white and Caribbean Blue soap into the mold. Save any last bits of white for the very top. Our final white soap was a little bit on the thick side, and we ended up with some big glops of soap on top, but that's okay. If it's still somewhat fluid, you can use a Clean Up Tool (or knife, spoon, chopstick, etc.) and push and swirl the melt and pour to break up any big clumps.
- Allow the soap to fully harden and cool in the mold for at least 4-5 hours, preferably overnight. We find when we try to cut into melt and pour soap that's slightly warm, the layers are more likely to separate. Once it's cool, remove from the mold and cut into bars. Wrap the bars in plastic wrap to prevent glycerin dew. Enjoy.
3.3.3077
The post Seascape Melt & Pour Soap Tutorial appeared first on Soap Queen.

Keine Kommentare:
Kommentar veröffentlichen