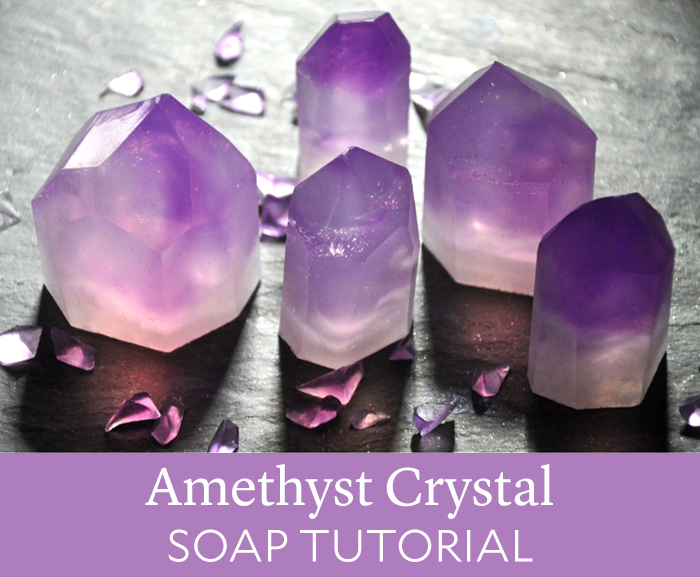
Happy Friday, everybody! This is Lane (aka Mama Bass) from Mama Bass Handmade Soap, and I am going to teach you how to make Amethyst Crystal Soap Points out of clear melt and pour soap. I’m very excited to be given this opportunity to test out Bramble Berry’s new Amethyst Fragrance Oil and even create something cool for you guys to learn!
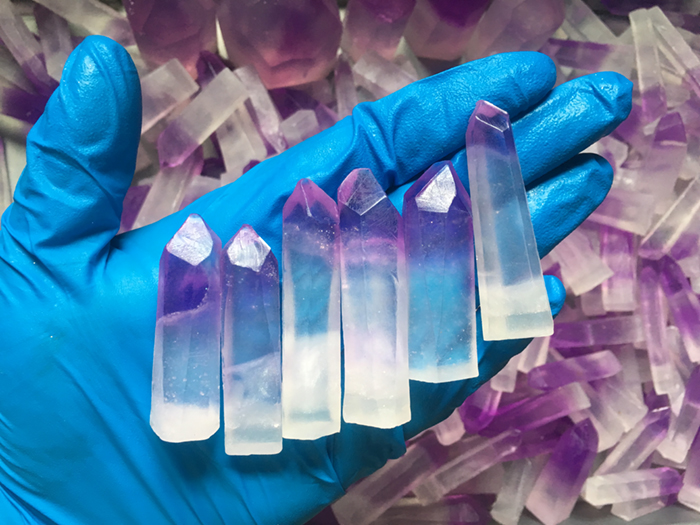
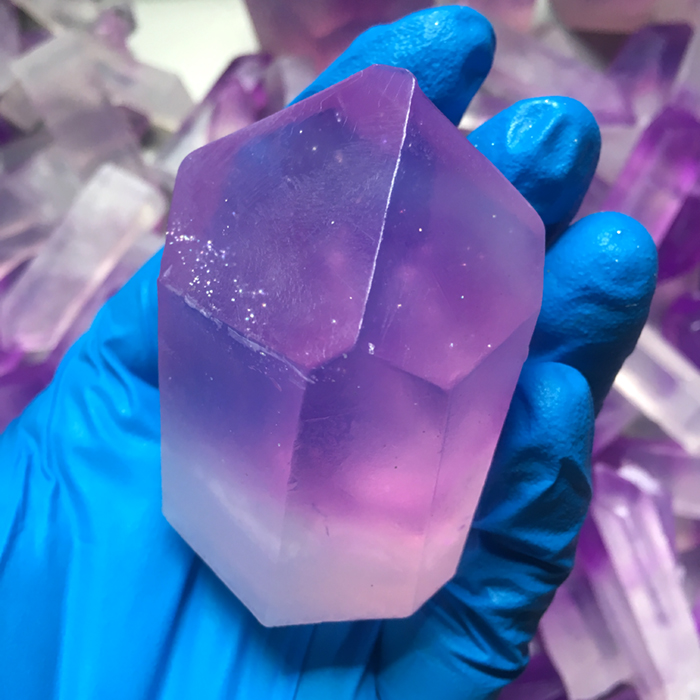
There are so many beautiful things that you can make with these Amethyst Crystal Soap Points. They are one of my absolute favorite things to make. I’m happy to show you how I make them, as well as another project to use the soap points in!
I filmed the making of these projects, so there are videos along with step-by-step instructions. So without further hesitation, let’s get started!
What You Need:
10″ Silicone Loaf Mold
50 oz. Stephenson Ultra Clear Soap Base
30 mL Amethyst Fragrance Oil
Tropical Purple Low pH LabColor
Super Pearly White Mica
Fine Silver Rainbow EcoGlitter
Droppers
99% Isopropyl Alcohol in a Spray Bottle
Tools:
Bramble Berry’s Perfect Scale
Infrared Thermometer
Spatula
.15 CC Scoop
5 Quart Glass Mixing Bowl with Lid
Small Microwave-Safe Measuring Cup
Gloves (to avoid fingerprints)

Click here to add everything you need for this project to your Bramble Berry shopping cart!
Make the Crystals
DILUTING LABCOLOR: You'll need to premix your LabColor for this project. We like diluting the small bottle of LabColor in 4 oz. of distilled water. For more on diluting LabColors, check out this blog post.
ONE: Cut up 50 ounces of Ultra Clear Soap Base and add it to the 5 Quart Mixing Bowl. Melt in the microwave using 30 second to 1 minute bursts as many times as needed until completely melted.
TWO: Once the soap is completely melted, pour 16 ounces of the melted soap into a smaller measuring cup and set the rest of the soap aside.
TIP: Pre-warm the measuring cup in the microwave for about 30 seconds so the soap doesn’t cool drastically when transferred.
THREE: Using a dropper, add 3 drops of Tropical Purple LabColor to the 16 ounces of soap and stir until completely combined.
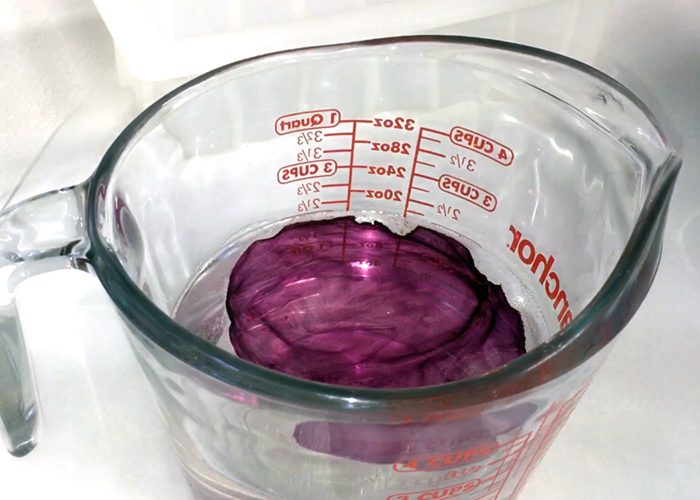 FOUR: Add 12 mL of the Amethyst Fragrance Oil to the purple soap and stir until completely blended.
FIVE: Pour most of the melted purple soap to the mold. Reserve about 4-6 ounces in the container, and add 3 more drops of the Tropical Purple LabColor to the rest of the melted soap for a more vibrant purple color.
SIX: Pour the rest of the dark purple soap into the lighter color purple already in the mold. With a spoon or spatula, swirl the soap around a little bit. Spritz with alcohol to get rid of bubbles.
SEVEN: Let the soap cool and harden until it forms a skin. Then, dust on a fine sprinkling of Fine Silver Rainbow EcoGlitter on top.
 EIGHT: Add 18 mL of Amethyst Fragrance Oil to the remaining uncolored soap. Stir until fully incorporated.
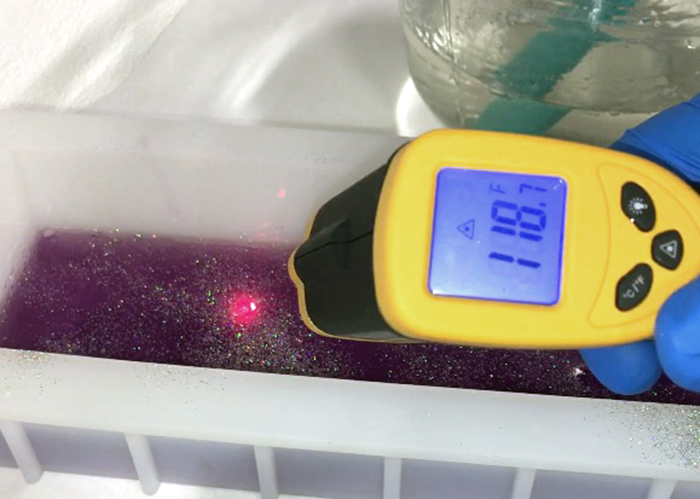
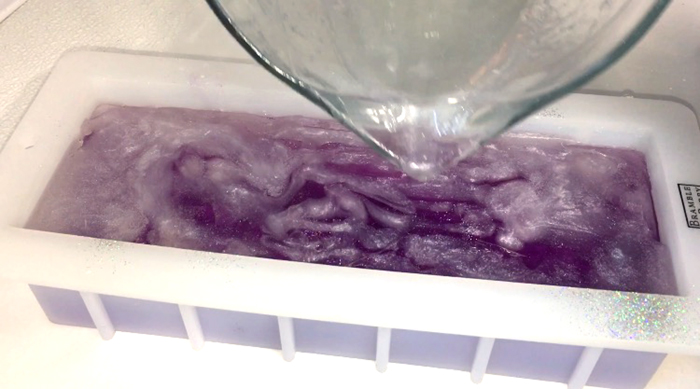
TEN: Once the soap is the correct temperature (see note), spritz the purple soap with alcohol. Pour some of the clear soap into the purple soap slowly. Reserve about 8 ounces of clear soap. Spritz with alcohol once more.
NOTE: It’s very important at this point to keep track of temperatures. The idea is to have the clear soap warm enough to penetrate the purple soap that is already in the mold. The ideal temperature for the purple soap in the mold is around 120° F, and the ideal temperature for the clear soap in the bowl that you’re about to pour is around 135°.
ELEVEN: At this point, the remaining soap may have cooled and hardened. If so, heat up the soap in the microwave again for 20-30 seconds to make it fluid. When it’s liquid again, add two .15 CC Mini Scoops of Super Pearly White Mica to the reserved clear melt and pour.
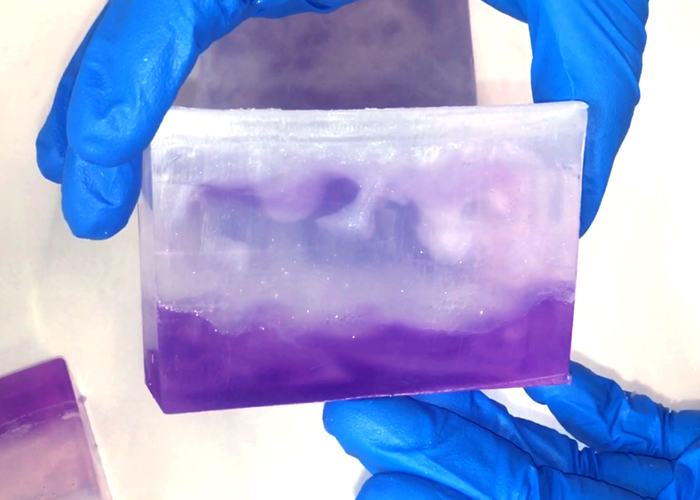
TWELVE: Spritz the soap in the mold with alcohol again and carefully pour the white soap onto the clear soap in the mold. It will penetrate into the clear soap, so be mindful not to pour too high or too fast. Spritz with alcohol to eliminate bubbles, and let completely dry and harden for several hours up to overnight.
Cut the Crystals
ONE: After the soap has completely hardened, it’s time to cut. Remove the soap from the mold. Carefully cut the loaf into bars the width you’d like to cut your crystal point. Vary the widths anywhere between .5″ and even up to 2″ (for large crystal points). Just give yourself variation for whatever size you decide. If you prefer large points, 1.5″ to 2″ slices work best. For the smaller points, create 0.5″ to 1″ slices. Sometimes I’ll even go as far as to slice a 0.5″ bar into a 0.25″ bar for teeny tiny crystal points.
TIP: Please refer to the attached Amethyst Point cutting video to see the technique for cutting the points, I’ll try my best to explain in words, but it’s really a whole lot easier to understand when you see it!
TWO: With the purple side up, slice the bar into even sections where the top edges look like a square.
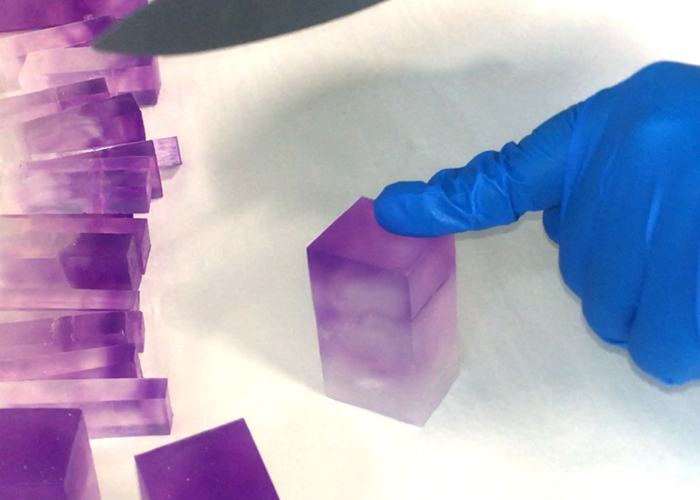 THREE: Very carefully, cut all four corners off of the section.
FOUR: On the corners you cut off, place the knife upward and diagonal, about 2/3 of the way up the section of soap, and very carefully cut the soap into a crystal shape on all four top corners.
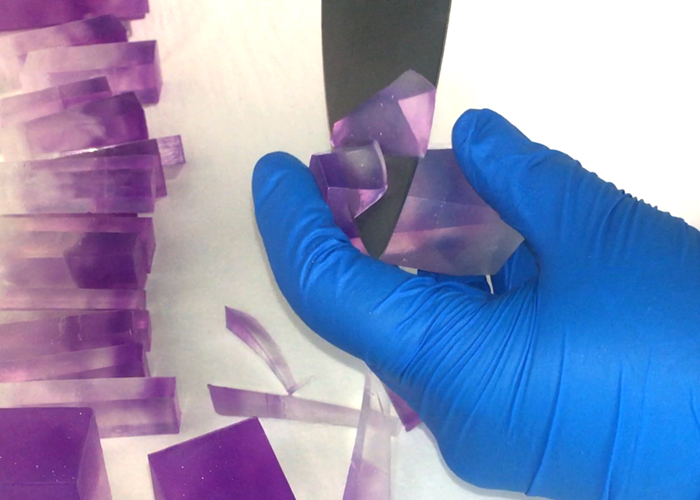 FIVE: The soap should now look like like an amethyst crystal point. Do this repeatedly until all the bars are cut into into crystal point shapes!
TIP: Keep the scraps and extra cuttings to use in later projects. They look like little amethyst chips, so hold onto them!
That’s it! I hope you enjoyed this tutorial and are inspired. I would love to see what you all create! Below is a video to show you how you can use these soap crystal points as embeds in another project.
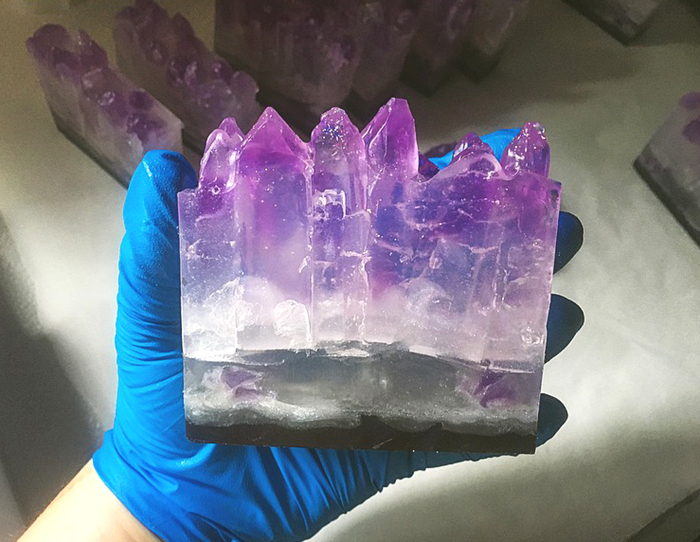
In the video below, you can see on how to embed the crystal points into the 10″ Silicone Loaf Mold to create Amethyst Geode Slice Soaps. I used Pewter Silver Mica and a Black Oxide Color Block to create the shades in the base. For another idea, check out the video for Amethyst Cluster Pool Soaps on my YouTube Channel. 
 ✨
✨
Find Lane of Mama Bass Handmade Soaps
Shop
Facebook
Instagram
YouTube
Amethyst Crystal Soap Tutorial
Author: Mama Bass
Recipe type: Melt and Pour Soap
- 10″ Silicone Loaf Mold
- 50 oz. Stephenson Ultra Clear Soap Base
- 30 mL Amethyst Fragrance Oil
- Tropical Purple Low pH LabColor
- Super Pearly White Mica
- Fine Silver Rainbow EcoGlitter
- Droppers
- 99% Isopropyl Alcohol in a Spray Bottle
- Bramble Berry's Perfect Scale
- Infrared Thermometer
- Spatula
- .15 CC Scoop
- 5 Quart Glass Mixing Bowl with Lid
- Small Microwave-Safe Measuring Cup
- Gloves (to avoid fingerprints)
- Cut up 50 ounces of Ultra Clear Soap Base and add it to the 5 Quart Mixing Bowl. Melt in the microwave using 30 second to 1 minute bursts as many times as needed until completely melted.
- Once the soap is completely melted, pour 16 ounces of the melted soap into a smaller measuring cup and set the rest of the soap aside. TIP: Pre-warm the measuring cup in the microwave for about 30 seconds so the soap doesn't cool drastically when transferred.
- Using a dropper, add 3 drops of Tropical Purple LabColor to the 16 ounces of soap and stir until completely combined.
- Add 12 mL of the Amethyst Fragrance Oil to the purple soap and stir until completely blended.
- Pour most of the melted purple soap to the mold. Reserve about 4-6 ounces in the container, and add 3 more drops of the Tropical Purple LabColor to the rest of the melted soap for a more vibrant purple color.
- Pour the rest of the dark purple soap into the lighter color purple already in the mold. With a spoon or spatula, swirl the soap around a little bit. Spritz with alcohol to get rid of bubbles.
- Let the soap cool and harden until it forms a skin. Then, dust on a fine sprinkling of Fine Silver Rainbow EcoGlitter on top.
- Add 18 mL of Amethyst Fragrance Oil to the remaining uncolored soap. Stir until fully incorporated.
- Once the soap is the correct temperature (see note), spritz the purple soap with alcohol. Pour some of the clear soap into the purple soap slowly. Reserve about 8 ounces of clear soap. Spritz with alcohol once more. NOTE: It's very important at this point to keep track of temperatures. The idea is to have the clear soap warm enough to penetrate the purple soap that is already in the mold. The ideal temperature for the purple soap in the mold is around 120° F, and the ideal temperature for the clear soap in the bowl that you're about to pour is around 135°.
- At this point, the remaining soap may have cooled and hardened. If so, heat up the soap in the microwave again for 20-30 seconds to make it fluid. When it's liquid again, add two .15 CC Mini Scoops of Super Pearly White Mica to the reserved clear melt and pour.
- Spritz the soap in the mold with alcohol again and carefully pour the white soap onto the clear soap in the mold. It will penetrate into the clear soap, so be mindful not to pour too high or too fast. Spritz with alcohol to eliminate bubbles, and let completely dry and harden for several hours up to overnight.
- After the soap has completely hardened, it's time to cut. Remove the soap from the mold. Carefully cut the loaf into bars the width you'd like to cut your crystal point. Vary the widths anywhere between .5″ and even up to 2″ (for large crystal points). Just give yourself variation for whatever size you decide. If you prefer large points, 1.5″ to 2″ slices work best. For the smaller points, create 0.5″ to 1″ slices. Sometimes I'll even go as far as to slice a 0.5″ bar into a 0.25″ bar for teeny tiny crystal points.
- With the purple side up, slice the bar into even sections where the top edges look like a square.
- Very carefully, cut all four corners off of the section.
- On the corners you cut off, place the knife upward and diagonal, about ⅔ of the way up the section of soap, and very carefully cut the soap into a crystal shape on all four top corners.
- The soap should now look like like an amethyst crystal point. Do this repeatedly until all the bars are cut into into crystal point shapes! TIP: Keep the scraps and extra cuttings to use in later projects. They look like little amethyst chips, so hold onto them!
3.3.3077
The post Amethyst Crystal Soap Tutorial appeared first on Soap Queen.


Keine Kommentare:
Kommentar veröffentlichen